Git basics
21 Feb 2023
Summary
- What is source control and how it works
- What is git and how it works
- The main git entities
- What are git hosting services
- The main git commands and flows
What is source / version control
Version control, also known as source control, is the practice of tracking and managing changes to software source code. Version control systems are software tools that help software teams manage changes to source code over time. They do this by recording the changes to files over time.
Why? Because the source code is an important asset for any team, so protecting it is essential. Source control systems allow:
- Backing up code
- Having a history for each individual file, so we can go through each of these versions. The source control history is a piece of documentation that is updated along with the source code and ideally tracks and explains the reasons for each change made to the code
- You can preview previous states and decide to revert some or all the files to such a previous state
- Teams can parallelize development by allowing different members to work on different tasks (features, bugs, …). Source control allows integrating all these independent modifications to the code.
- Comparing and tracking changes over time, identify the exact time when a change was introduced and why
What is Git
By far, the most widely used modern version control system in the world today is Git. Git is a mature, actively maintained open-source project originally developed in 2005 by Linus Torvalds, the famous creator of the Linux operating system kernel. A staggering number of software projects rely on Git for version control, including commercial projects as well as open source.
At the root of the git system is the concept of a repository. The repository is used to store different files and folders in a tree structure, like a miniature file system.
Most version control systems store the information as a list of file-based changes. Git works differently, as git organizes its data like a set of snapshots on a miniature file system. These snapshots are called git commits. Every time you create a new commit, you basically save the state of the project files in git and create a reference to that state. That is what a commit is. Git is efficient and if some files have not changed from a previous snapshot, it will only link to the previous identical file it has already stored. You can think about it as a stream of snapshots.
Text and binary files
Git is very efficient in working with text files, such as source code files, plists, jsons, string files … This is because it can calculate the differences between text files and even apply compression to store them very efficiently. Diff is a shorter version of difference, and we will use this term further to describe the differences between 2 versions of the same file. Git can handle other non-text file types as binary files (images, videos, libraries, …), but it can’t apply the same optimizations as for text files. Storing many binary files, especially large ones, can impact the performance of git. If that happens, you can look into the git large file system extension that is designed for large binary files.
Why git?
Simply because git is:
- Distributed
- Each developer has a clone of the whole repository
- Offline access
- Multiple back-ups
- No need to share unwanted changes - you can keep some changes local until they are ready
- Sharing is easy
- Fast
- Nearly all operations are performed locally → no need to constantly talk to the server → very fast
- Git uses gzip compression
- The only operation that is slower is the initial clone operation, where git is downloading the entire history of the repository
- Preserves the integrity of the files
- The data model that Git uses ensures the cryptographic integrity of every bit of your project.
- Every file and commit is checksummed and retrieved by its checksum when checked back out.
- It’s impossible to get anything out of Git apart from the exact bits you put in.
- Supports non-linear development
- Git allows and encourages you to have multiple local branches that can be entirely independent of each other.
- Keeps multiple streams of work independent of each other while also providing the facility to merge that work back together, enabling developers to verify that the changes on each branch do not conflict.
- Creating, merging and deleting these lines of development takes seconds.
- Scalable
- Simple, Free and Open source
Git hosting services
Git is a version control system that can be viewed as a tool. To store git repositories, we need hosting services. These are called git hosting services, and they act like servers that host git repositories among other things (e.g. user-based access and permissions, repo statistics, …). Famous ones include: GitHub, Bitbucket, GitLab.
In a simplified scenario, git can be used entirely locally on just one machine, but its greatest power is when it’s used across machines.
Most people will use git as a server - client, where one git server like GitHub will act as the single source of truth. All the clients will pull code from the server, make local changes and push the modified code to the same server. But that’s not the only way in which git can work. Being a distributed system, each machine having a copy of the repository can act as a server for other machines.
Main Git entities
Repository
The repository is a data structure that stores files and folders and corresponding metadata. This metadata is saved in a special .git folder and is represented by all the versions of these files and folders over time. Or you can look at a repository like a collection of commits. Each client will have a full copy of the repository.
Working copy
The working copy is a single checkout of one version of the project. These files are pulled out of the database in the .git directory and placed on disk for you to use or modify.
Commit
The commit is a snapshot of your working copy at a certain time, identified by a revision number (hash). Besides the snapshot, it contains info such as the author, the date, and time and a message describing the changes done. Each commit can have from zero parents (the 1st commit in each repo), to 1 parent (linear structure) to more than 1 parent (where a merge was done).
Branch and tag
While for many version control systems, branches and tags are full copies of the repository content, in git, branches and tags are just commits with a name attached to them. That is why it’s trivial to create / remove branches or even to update them aka change the commit with the name. The same is true for tags, even though git tag commands are a bit more restrictive. From a theoretical standpoint, a branch supports an independent line of development. It has a lifetime, when the developers will use the branch to develop independently of other branches, commit their work and in the end, port their changes back to one of the main branches.
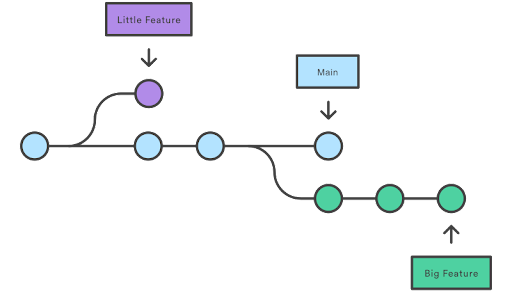
In contrast, a tag is a label we attach to a version of the project that we want to preserve with time, so we can revisit later. For example, releasing a new version of the project is a good time to create such a label, so you know exactly the state of the source code used for that release. So in that line, tags are not meant to be modified.
HEAD
The HEAD is the name of the commit that’s currently checked out. In git, you can check out any commit at any time. Checkout means simply setting the repo files in the state of the commit you select.
Git commands
Git uses many commands with different options that allow a multitude of operations. Any tool you use would still rely on these commands under the hood: Git clients like Xcode’s git integration, SourceTree, GitHub’s Mac App, … Or even editing the repo through a website (i.e. GitHub’s web interface) They all work with the same git commands and show the same info from git.
Config
When you first install git on a machine, you need to configure it. Configuring git can be done through the git config command or by directly editing a file ~/.gitconfig.
Using the commands will edit the same file we just mentioned.
You can at least set up your git username and email.
git config --global user.name "John McClane"
git config --global user.email "john@email.com"
Creating a new repository
To create a new local git repository, we will use the git init command in the folder that we want to be the root folder of the repository.
This will just initialize the git repository by creating a .git folder with some basic info. The repository is empty, there are no commits, no branches or other entities yet.
Hosting services like GitHub also have an option to create a new repository. Using this option will require you to answer a few questions like the name and location of the new repository and if it needs any template files like README or LICENSE. GitHub will create a new repository on its backing git system. It will also create a first commit with all the files you chose to create.
And a branch called main.
To use this new repository, you need to clone it on your machine.
Cloning a repository
By using the git clone <URL> command, one can clone aka fully copy a repository on his / her machine. You require this to be able to make changes to the repository.
For the cloning to work, you will need permissions to that repository.
There are 2 main types of cloning - via HTTPS or SSH.
Via HTTPS
Using an HTTPS url like https://github.com/bpoplauschi/bpoplauschi.github.io.git will set up an HTTPS connection to the repo, so it will require a user and password authentication in order to clone it and for all future communications with the git server.
Via SSH
Using a SSH url like git@github.com:bpoplauschi/bpoplauschi.github.io.git will create an SSH connection which requires an SSH public - private key pair that is used for authentication.
You will need to set up your machine so it allows SSH connections to services like GitHub by creating a local SSH key pair or installing a key pair from another machine - see Connecting to GitHub with SSH. The public key needs to be added to your GitHub account, so the service has it so it will allow your connections using the private key.
You can easily verify your SSH setup is correct by running ssh git@github.com.
In either case, you need read access to the repository or just a public repository to perform the clone.
Now that you have a local repository (either by cloning or creating a new local repo), you can start editing it.
Status
You can always inspect the status of the repo using the git status command - this will output the current checked out branch and local changes, both non-staged and staged.
Staging area
After you make changes to the files in your repository, you will need to commit those changes into the repository.
Git has a so-called “staging area” that is an intermediate area where commits can be formatted and reviewed before completing the commit.
You can add and remove to and from stage entire files or just some modified lines.
git add
Some git tools (like Xcode’s git integration) will not show you the staging area, but it’s useful to know it’s there.
When you commit, you will commit all the content added to the staging area.
NOTE: any change to a file that is not committed can be lost if we change branches, merge, reset, … Only after we have committed, we are confident the data is safely stored in our repository. So commit as often as possible - this will help you avoid losing precious code.
NOTE: you can always drop changes and go back to the previous git state using different commands. One such command is git reset –hard that will undo all the local changes from the current HEAD.
Diff
Moreover, you can view at any time a diff between the current head (currently checked out commit / branch) and the local changes made after that.
git diff or git diff --cached for staged changes.
Committing
To save progress on our changes into the repository, we will create commits. This assures our changes are safe and can be retrieved later if needed.
git commit -m “Message”
This will create a new commit on the current branch with the message included and containing all the content from the staging area.
A good practice we encourage is to make small commits where we change only a few files and that has a single reason for change.
Checkout
You can always checkout any commit (aka get the repo files in the state they were at that commit):
git checkout <COMMIT_HASH>
Note that checkout will result in all the files tracked by git being replaced with their version from the commit you are checking out. If you have local changes, you will need to do something with them (like commit), before you can checkout a different commit.
Log
To inspect the current git history using the command line, the simplest option is to use:
git log or
git log --all --decorate --oneline --graph
Or you can just use a git client with UI where we can visually inspect commits, branches …
Branching
Remember, branching is useful to support multiple lines of development. A good practice is to create a branch for each line of development:
- For each feature or partial feature
- For each bug or fix
- For each refactoring
- For each idea you try out The big advantage is we can seamlessly switch from one branch to another and come back. Using git branches allows us to:
- work on a feature
- then create a different branch for a bug fix we need to solve now
- then switch to another branch to review a colleague’s work
- and return to the branch for our feature with little to no cost.
If we have a repository created using a git hosting service like GitHub, it will have a main branch by default.
You can create as many other branches as you want without extra costs to the repo, as you know, branches are just names given to particular commits.
You can create a branch using
git branch <BRANCH_NAME>
You can list all the existing branches using git branch (add -v for extra info)
Git allows and encourages you to have multiple local branches that can be entirely independent of each other.
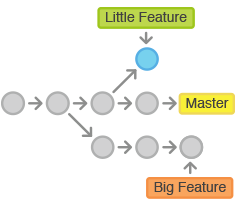
You can switch between branches using
git checkout <BRANCH_NAME>
This is very fast.
After you’re done with the work for a feature / bug / experiment, you can decide to share this branch with others or just discard it.
Merge
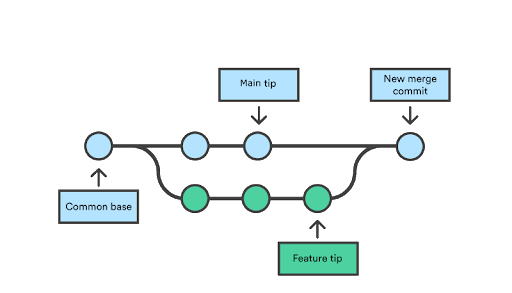
Merging is Git’s way of putting a forked history back together again. The git merge command lets you take the independent lines of development and integrate them into a single branch.
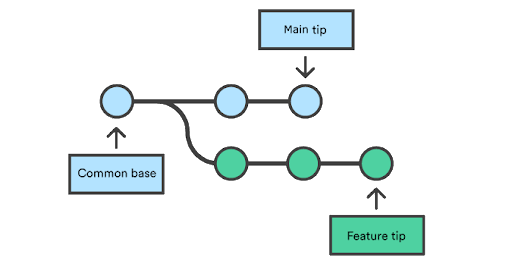
So from 2 different lines of development, we can use git merge to combine them into a single branch, usually we develop on a feature / bug branch and then merge back to our default branch - in this case main.
Merge is important because from the time we start a branch from main until we integrate back to it, other branches might be integrated as well, so we have to combine all these changes together.
Sometimes, if the different lines of development change the same files, at merge we will see conflicts (these cannot be automatically resolved by git) that we must resolve on our own.
Local vs remote
All these operations like initializing an empty repository, creating commits, creating or switching branches and even merging branches are local operations, and they don’t require a connection with a git service.
But we work in teams, so we usually store the git repositories on a service like GitHub, which means this is the central repository where everyone gets the latest changes from and where they upload their changes.
Git is designed to give each developer an entirely isolated development environment. This means that information is not automatically passed back and forth between repositories. Instead, developers need to manually pull upstream commits into their local repository or manually push their local commits back up to the central repository.
Remotes
So, a git remote is an external location that has a copy of the same repository we have locally. We can use git commands to pull changes from this remote or to push our changes. And using a git interface, we can compare the local state of the repo to the remote ones.
We can inspect the remotes on each local repository using
git remote –v
If we have just a local repository (created using git init), we will have no remotes here.
If we have cloned the repository from another location, we will usually have one remote called origin.
NOTE: we can add / remove / edit these remotes and have more than 1 at a time.
Remote branches
As soon as we have a remote set up, git can access the branches from that remote.
For example, using git branch -va will show all the branches, local and remote.
Fetching changes to remote branches
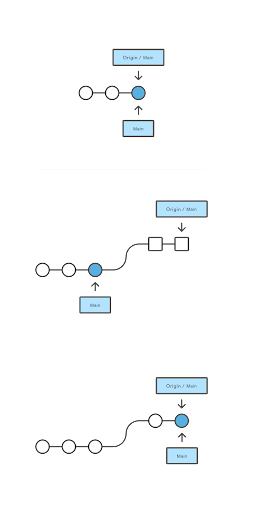
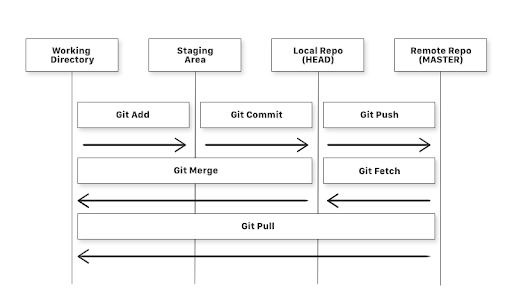
The git fetch command downloads commits, files, and branches from a remote repository into your local repo. Fetching is what you do when you want to see what everybody else has been working on.
But this is only informative, no changes will be applied to our local branches.
Pulling
The git pull command is used to fetch and download content from a remote repository and immediately update the local repository to match that content. Merging remote upstream changes into your local repository is a common task in Git-based collaboration workflows. The pull command is actually a combination of two other commands, fetch followed by merge.
git pull = git fetch + git merge
Pushing
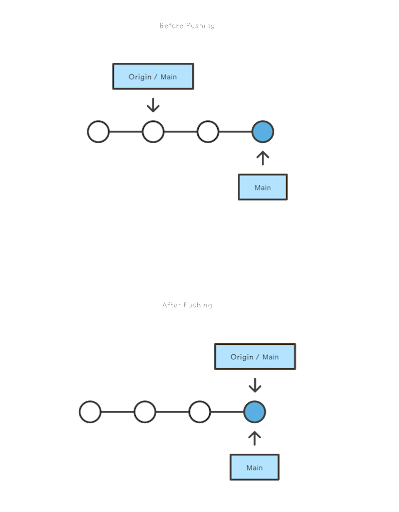
The git push command is used to upload local repository content to a remote repository. Pushing is how you transfer commits from your local repository to a remote repo. It’s the counterpart to git pull, but whereas pull imports commits to local branches, pushing exports commits to remote branches.
Pull Requests / Merge Requests
A Pull Request is a concept that exists only on GitHub (also called Merge Request on other services). From a git’s perspective, there are no pull requests.
These features exist on git hosting services like GitHub, and they make it easier for developers to collaborate.
Using a branch shared with other developers (this can be the main branch, a develop branch), you pull the latest changes so the main / develop branch is up-to-date.
Before making changes to it, you branch from it - creating a new local branch, then make some changes, push back the changes by creating a remote branch from your local branch. And now you want to integrate these changes back to the main / develop branch.
Usually, these branches are protected by GitHub, so you can’t push directly to them, so instead you express your intention of pulling your changes into the main / develop branch by creating a Pull Request.
The Pull Request object exists only on the GitHub service, your local git repository has no notion about PRs.
Other developers on your team can review your PR, comment, and request changes. When it’s approved, the PR can be merged using GitHub’s interface, which will result in a merge commit on the main / develop branch that merges the new branch you created back into its original branch. This is a regular git merge, only created by GitHub. So, you have to pull from the main / develop branch to get this.
Forks
Services like GitHub have many features, among which is a very detailed and granular access control. A project’s admin can allow some users to read / fetch the repo’s contents but not push to it (read-only) while only a few have write / push permissions. GitHub has public repositories that can be read by every user and private repositories that limit the users that can access them. To facilitate collaboration between users, GitHub and other services have the option to Fork a repository. When a user forks a repository, he creates their own server-side copy of that repository. The difference is the user has full access to their fork repo. So, they can create branches, delete branches, push and pull code. Forks are really useful when you want to contribute to repos where you don’t have push permissions. If you have forked a repository, you can track it locally via a new remote (besides the origin one pointing at the main repository). GitHub and other services allow creating PRs on the main repository from branches pushed to forks. Once the team maintaining that repo approves the PR and merge it, your changes will be integrated into that central repo - just like any other merge operation.
Ignored files
Git will ignore files or folders that follow certain conditions of name or path.
These regex filters can be added in a .gitignore file contained in each repo and in a ~/.gitignore_global file that exists under your Mac local account and affects all repositories. Make sure what you add to these files, as the files and folders matching these patterns will be entirely ignored by git.
While the .gitignore file is checked in the repo and will affect all the other repo copies, the .gitignore_global is local to your machine and this can make git behave differently on your machine than on others.
Recap
Recommendations
Every team will have its preference. It’s up to you to decide, but here are our recommendations:
Commit as often as possible
We recommend you make small commits, as often as possible. Then commit should modify only a handful of files, and it should have one very specific reason / goal. Make sure you describe this reason in the commit message.
These commits will act like checkpoints you can go back to when things get messy. Don’t rely on UNDO, or you’ll lose work. It’s similar to playing a video game, you want to save often, so you can continue from a safe state which is very close to the current one.
Moreover, consider these commits might be reverted if the change turns out to be temporary or inappropriate. So make your commits with this in mind. It’s very hard to partially revert a large commit.
Write good commit messages
It’s essential to write descriptive and clear commit messages describing the intent of the changes, not the actual implementation. For example, it’s clear from the code that we are adding 2 new functions to a class. What is not clear is why we are doing it. Git commit messages will serve as a documentation for all the changes made to the source code and the reasons for these changes.
Tag releases
It’s very useful to use tags to mark the commit representing each release you make, whether it’s internal or external. It will also add context to your repo, of all the releases you made. And when a problem occurs in a previous release, you can checkout and inspect exactly the state of the code you used for that release.
Periodical clean up
Make a habit of cleaning up git. Delete unused branches, both locally and from the remote repo.
References
- Git Documentation
- Git Reference (all commands)
- Git Tutorials and Training by Atlassian
- Git Cheat Sheet by GitHub
Tags: git source control
💬 Comments
Post comment using GitHub